

Restoring an archived or expired domain for a private blog network often goes smoothly until you open the recovered site and find broken image placeholders scattered across every page. Missing images in restored PBN sites are one of the most common post-restoration problems, and they stem from a handful of predictable causes: absolute URLs pointing to a defunct server, incomplete archive crawls, database path mismatches, or media files that were simply never included in the backup. Understanding which cause applies to your situation determines the fastest repair path, so this guide walks through each scenario with practical steps you can follow without advanced server administration skills.
Key Takeaways
- Most missing images in restored PBN sites trace back to absolute URL mismatches, incomplete archive exports, or media files excluded from the backup rather than permanent data loss.
- The Wayback Machine, Google Cache, and original hosting backups are the three most productive sources for recovering image files that did not transfer during restoration.
- A WordPress database search-and-replace on the old domain URL is usually the fastest fix when images exist on the server but still reference the previous domain or path.
- Re-uploading recovered images through the WordPress Media Library and regenerating attachment metadata preserves compatibility with themes and plugins that rely on registered media entries.
- After repairs, verifying image indexing and confirming that restored content pages load correctly supports the overall link equity and topical relevance that make a PBN placement valuable.
Why Images Go Missing After a PBN Site Restoration
A PBN site restoration typically involves one of three scenarios: importing a full-site backup from a previous host, rebuilding from a database export combined with a separate files archive, or reconstructing the site from archived snapshots such as those stored by the Wayback Machine. Each method has a different failure mode for images.
When restoring from a hosting backup, the most frequent problem is that the backup tool captured the database and theme files but excluded the wp-content/uploads directory, either because the directory was too large, the backup was configured to skip media, or the export was interrupted. The WordPress database still contains attachment records pointing to file paths that no longer exist on the new server, so every image renders as a broken placeholder.
When rebuilding from a database export and a separately downloaded files archive, path mismatches are the dominant issue. If the old site ran at one domain and the restored site runs at a different domain or subdirectory, every absolute URL stored in the database still references the original location. WordPress stores image URLs in the wp_posts table inside post content, in the wp_postmeta table as attachment metadata, and sometimes in serialized option values. A simple file transfer does not update those references automatically.
When reconstructing from Wayback Machine snapshots or similar web archives, the crawl coverage is the limiting factor. The Internet Archive indexes pages it has crawled, but it does not guarantee that every image asset linked from those pages was captured, particularly for images loaded via JavaScript, served from a CDN, or hosted on a subdomain that was not separately crawled. Images that were never archived cannot be recovered from that source.
Diagnosing Which Images Are Missing and Why
Before attempting any repair, map the scope of the problem. Opening a few pages manually gives a rough impression, but a systematic crawl gives you an actionable list. Tools such as Screaming Frog SEO Spider can crawl a restored site and report every broken image URL alongside the page where it appears. Export that list as a CSV so you have a structured reference for the repair work.
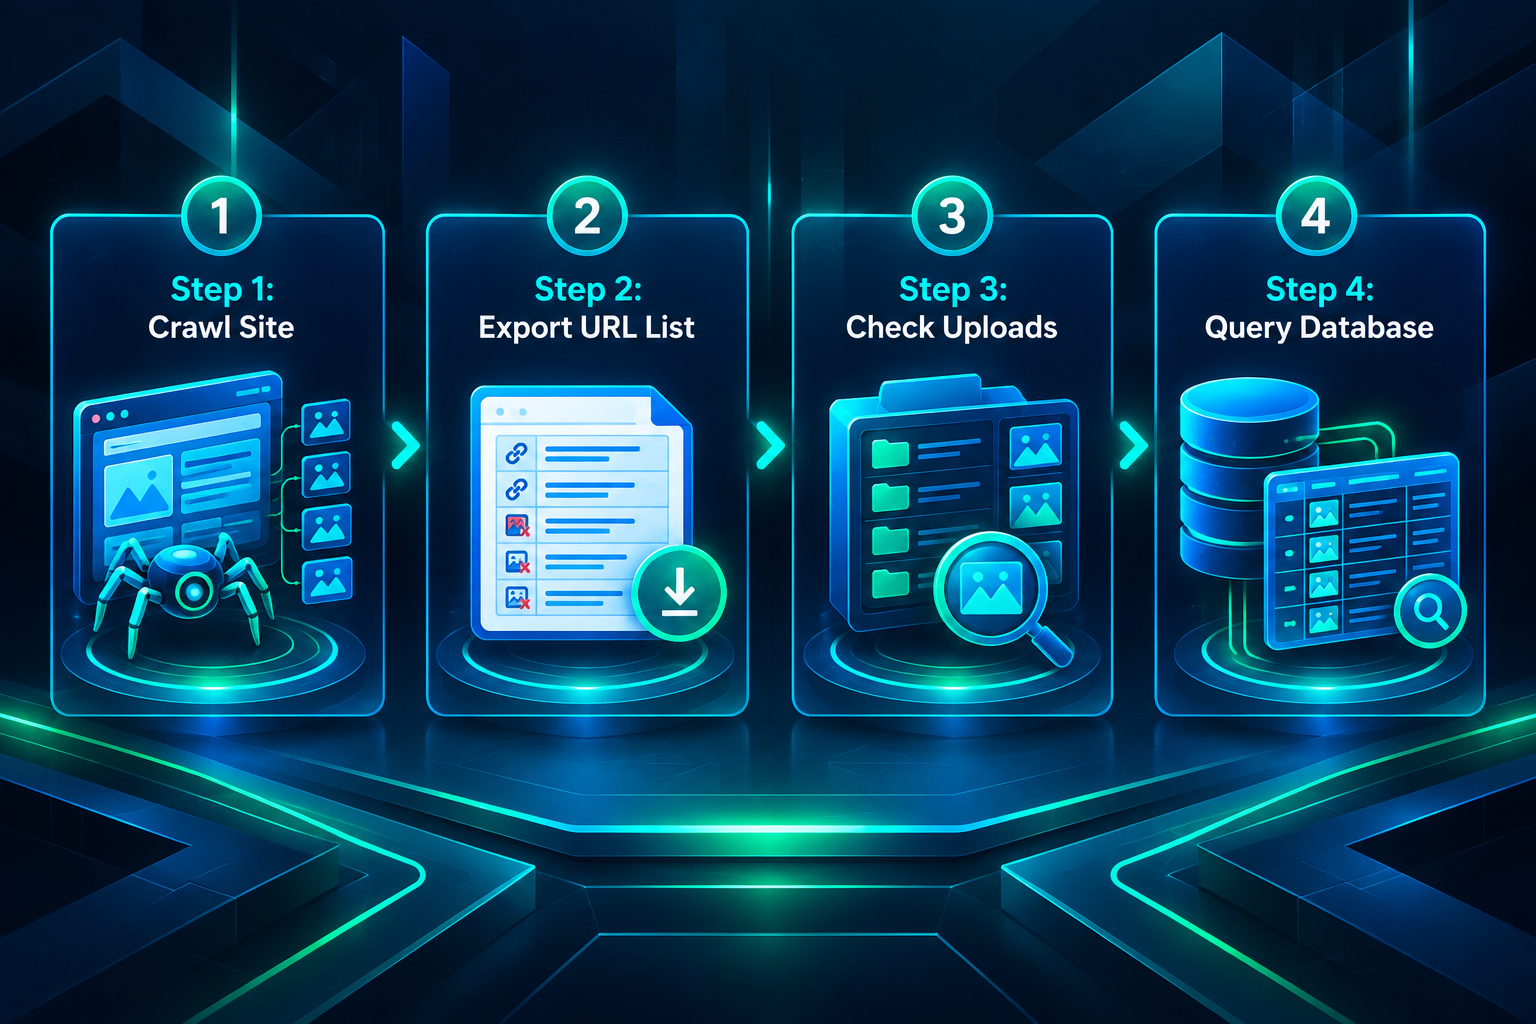
For each broken image URL, note the full path. If the path contains the old domain name, the problem is almost certainly a database URL mismatch rather than a missing file. If the path uses the correct new domain but the file genuinely does not exist in the uploads directory, the file was not transferred. If the path is a relative reference and the file is absent, the uploads directory was excluded from the backup entirely.
Check the server’s wp-content/uploads directory directly using an FTP client or the hosting file manager. Compare what is present against the attachment records in the WordPress database. A query against the wp_posts table filtered to post_type = ‘attachment’ returns every registered media file. If the database has hundreds of attachment records but the uploads directory is empty or sparse, the media files were not included in the restoration.
Fixing Absolute URL Mismatches with a Database Search and Replace
When image files are physically present on the server but still reference the old domain in the database, a search-and-replace operation on the database resolves the problem without re-uploading anything. The standard tool for this in WordPress is the WP-CLI command-line interface, which handles serialized data correctly and is available on most managed hosting environments.
The relevant command searches every database table for the old domain string and replaces it with the new domain. Because WordPress stores some values in PHP serialized format, a naive SQL find-and-replace can corrupt those values by leaving the stored string length incorrect. WP-CLI’s search-replace command accounts for serialization automatically, which makes it the preferred method over running a raw SQL UPDATE query in phpMyAdmin.
If WP-CLI is not available, the Better Search Replace plugin performs the same operation through the WordPress admin interface and also handles serialized data. Run the operation in dry-run mode first to preview the number of replacements before committing the change. After the replace, clear any caching plugin’s cache and reload the affected pages to confirm images now resolve correctly.
One additional check worth running after a domain search-and-replace is the wp_options table, specifically the siteurl and home values. If these still reference the old domain, WordPress may generate incorrect URLs for dynamically constructed image paths even after the content tables have been updated.
Recovering Missing Image Files from Archive Sources
When image files are genuinely absent from the server, recovery depends on finding them in an external source. The three most productive sources are the Wayback Machine, Google’s cached pages, and the original hosting provider’s backup system.
Using the Wayback Machine to Retrieve Images
The Internet Archive’s Wayback Machine stores snapshots of web pages and, in many cases, the image assets those pages referenced. To check whether a specific image was archived, enter the full original image URL directly into the Wayback Machine search bar. If a snapshot exists, you can download the file from the archive interface. For sites with many missing images, the Wayback Machine’s CDX API allows programmatic queries that return a list of all captured URLs matching a given domain and path pattern, which can be used to build a download script.
A practical approach for bulk recovery is to use a tool such as HTTrack or a custom wget command targeting the archived version of the site. These tools can crawl the Wayback Machine snapshot of the original domain and download all reachable assets, including images, into a local directory. The recovered files can then be uploaded to the correct paths in the restored site’s uploads directory. Keep in mind that archive coverage varies: images that were rarely linked, loaded lazily, or served from a third-party CDN may not have been captured.
Checking Google Cache and Other Search Engine Caches
Google’s cached version of a page sometimes includes images that were present at the time of the last crawl. However, Google Cache is a page-level snapshot rather than a full asset archive, and image availability depends on whether the cache version loaded the images inline. For recently expired domains, the cache may still be accessible; for domains that have been inactive for an extended period, the cache is likely to have expired. Bing’s cache operates similarly and is worth checking as a secondary source.
Requesting Files from the Original Hosting Provider
If the PBN site was previously hosted on a managed hosting platform, the original host may retain backup snapshots for a period after account closure. Contacting the host’s support team and requesting a media directory export is worth attempting, particularly for sites that were active recently. Some hosts retain backups for 30 to 90 days after account termination, though this varies by provider and plan type.
Re-uploading Recovered Images and Restoring Media Library Records
Once you have recovered image files from an archive source, the method you use to restore them to the site affects how reliably WordPress recognizes and serves them.
The simplest approach is to upload files directly to the correct year-month subdirectory within wp-content/uploads using FTP or the hosting file manager, matching the original directory structure. This restores the physical files, but it does not create corresponding attachment records in the WordPress database. Pages that reference those images by their direct URL will display them correctly, but the WordPress Media Library will not show the files, and any plugin or theme feature that queries the database for registered attachments will not find them.
For a more complete restoration, use the Add From Server plugin or a similar tool that scans a specified directory and registers the files it finds as WordPress media attachments. This creates the necessary database records and makes the images available through the Media Library. After registration, run the Regenerate Thumbnails plugin to create all thumbnail sizes that the active theme expects. Missing thumbnail sizes can cause images to display at incorrect dimensions or fall back to a placeholder even when the full-size file is present.
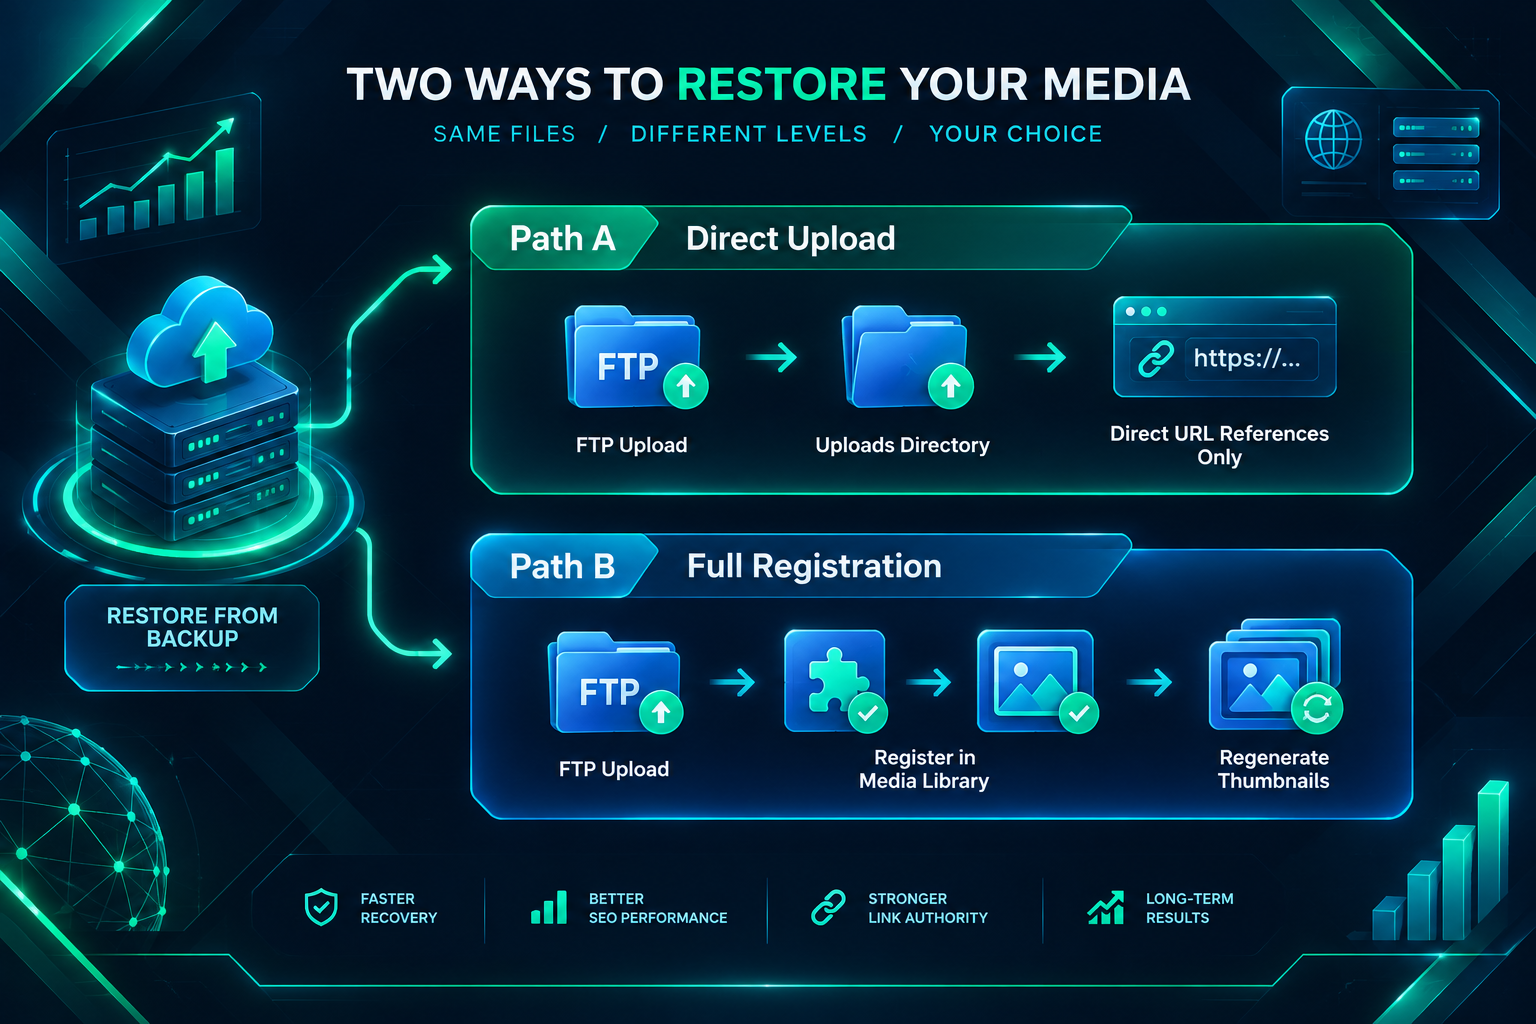
If the volume of missing images is large and the original directory structure is known, a bulk FTP upload followed by a database import of the original attachment records is the most efficient path. Export the attachment-related rows from the original database before decommissioning the old host, and import them into the restored site’s database after adjusting the domain references. This preserves all metadata including alt text, caption, and title fields, which contribute to the content quality of the restored pages.
Handling Images That Cannot Be Recovered
Some images will not be recoverable from any archive source. For a restored PBN site, the practical question is whether to replace those images with new ones or leave the gaps. Leaving broken image placeholders on content pages reduces the perceived quality of the page and may affect how crawlers assess the content, so replacement is generally the better choice.
Replacement images should be topically relevant to the surrounding content. For a PBN site, content quality and topical relevance are meaningful factors in how much link equity a placement can pass, so pages with coherent, complete content tend to serve that purpose more effectively than pages with obvious gaps. Stock image libraries, royalty-free image sources, and AI image generation tools can all supply replacement images quickly. When replacing images, update the alt text to reflect the actual content of the new image rather than leaving a generic or empty attribute.
If the original image was a custom graphic, chart, or branded asset that cannot be replicated from a stock source, a simple replacement illustration or a relevant photograph covering the same topic is usually sufficient for a restored content page. The goal is a complete, readable page rather than an exact replica of the original design.
Verifying the Repair and Checking Image Indexing
After completing image repairs, run a second crawl with Screaming Frog or an equivalent tool to confirm that no broken image URLs remain. Filter the results to show only 4xx and 5xx status codes for image resources. A clean crawl with no broken images confirms the file-level repair is complete.
For PBN sites where the restored domain carries historical link equity and is intended to pass authority through contextual placements, confirming that the restored pages are indexable and that the content loads correctly is an important follow-up step. Use Google Search Console to submit the sitemap and monitor coverage reports. Pages with missing resources, including images, may be crawled less efficiently or assessed differently by search engine crawlers, so a fully resolved page is preferable before the site is used for active link placements.
Check that image file sizes are reasonable after restoration. Archive-sourced images are sometimes saved at reduced quality or incorrect dimensions. Oversized image files slow page load times, which can affect both user experience and crawl efficiency. Compress restored images using a tool such as ShortPixel or Smush before the site goes into active use.
Preventing Image Loss in Future PBN Site Backups
The most effective way to avoid repeating this repair process is to ensure that future backups of PBN sites explicitly include the media uploads directory. Many default backup configurations in plugins such as UpdraftPlus or BackupBuddy allow you to specify which directories to include. Confirm that wp-content/uploads is included in every scheduled backup, and store backup archives in a location separate from the hosting account, such as cloud storage, so they remain accessible if the hosting account is closed.
For PBN sites built on expired or aged domains, taking a full-site snapshot immediately after the initial restoration and before making any content changes gives you a reliable recovery point. This is particularly useful when the restoration involved manual reconstruction from archive sources, since those sites are less likely to have a clean original backup available.
Frequently Asked Questions
Can I restore images from the Wayback Machine if the original domain has expired?
Yes, the Wayback Machine archives assets independently of whether the original domain is still registered. As long as the image URL was crawled and captured before the domain expired, you can retrieve the file directly from the archive using the original URL. Coverage is not guaranteed for every image, but it is a reliable first source to check for sites that were active for several years before expiration.
Will broken images on a restored PBN site affect how search engines crawl the pages?
Broken image references generate 404 errors for those specific resources, which crawlers log but do not treat the same way as a broken page URL. The page itself remains accessible and indexable. However, pages with multiple broken resources may be assessed as lower quality, and resolving them before using the site for active placements is a reasonable precaution.
Do I need to re-register images in the WordPress Media Library, or is uploading the files to the server sufficient?
Uploading files directly to the server is sufficient for pages that reference those images by their direct URL. However, re-registering images in the Media Library is necessary if the theme or any plugin queries the database for attachment records, generates srcset attributes from registered sizes, or displays images through a gallery or block that relies on attachment IDs. For a complete restoration, registering the files in the Media Library is the more thorough approach.
What should I do if the original image URLs used a CDN domain that no longer exists?
If images were served from a CDN subdomain or a third-party CDN URL, those URLs will not resolve after the CDN account is closed. The database search-and-replace approach still applies: replace the old CDN domain with the new domain where the files will be hosted. You will also need to upload the actual image files to the new location, either from a local backup or from archive sources if the CDN-hosted files were captured by the Wayback Machine.
How long does a full image restoration typically take for a restored PBN site?
The time required depends on the number of missing images, the availability of archive sources, and whether the files need to be re-registered in the database. A site with a few dozen missing images that are available in the Wayback Machine can typically be restored in a few hours. A site with hundreds of missing images that require manual sourcing or replacement may take a full day or more. Automating the archive download step with a script significantly reduces the time for large sites.
Getting a Restored PBN Site Ready for Active Link Placements
Repairing missing images is one part of a broader restoration checklist that determines whether a recovered PBN site is ready to support link placements effectively. A fully restored site with complete, readable content pages, functioning media, correct internal links, and a clean crawl profile is better positioned to pass meaningful link equity than one with visible gaps or broken resources. The image repair steps covered here address the most common post-restoration problem, but they fit within a larger process that includes verifying the domain’s indexing status, confirming that the restored content is topically coherent, and checking that no technical issues are preventing search engine crawlers from accessing the pages.
If you are evaluating restored or aged domains for a private blog network and want guidance on domain selection, placement quality, or how to structure a backlink campaign around recovered sites, PBN Backlinks Service can help you assess the options relevant to your specific goals. A domain and placement review before committing to a restoration project can save considerable time and ensure the effort produces a site that functions as intended within your link-building strategy.